macOS Setup & Workflow
- Doc no.
- KKZ-TN-042
- Date
- 2024-11-21
- Revised
- 2026-11-02
- GMT day
- 2024:326
- Est. read
- 8 min
在 Mac 上搭开发环境、配工具链、调快捷键和窗口管理时整理的笔记
01Homebrew#
参考资料
1.1homebrew 软件仓库和 homebrew bottles 软件仓库有什么不一样#
homebrew 仓库类型主要有两种,它们用途不同:
- homebrew 软件仓库(brew git remote)
- 包含所有软件包的安装脚本(Ruby 格式的 Formula)
- 主要仓库是 homebrew-core
- 仓库相对较小,包含的是软件包的描述文件
- homebrew bottles 软件仓库
- 存放预编译的二进制软件包
- 类似于 Linux 下的 .deb 或 .rpm 包
- 仓库较大,因为包含实际的软件二进制文件
- 使用 bottles 可以避免从源码编译,加快安装速度
举例说明: 当你运行 brew install wget 时:
- Homebrew 先从软件仓库获取 wget 的 Formula
- 然后检查 bottles 仓库是否有对应的预编译包
- 如果有 bottle 就直接下载安装,否则就按照 Formula 的指示编译源码
所以设置镜像时通常需要同时配置这两种仓库: 配置软件仓库以获取安装脚本,同时配置 bottles 仓库来获取预编译包
1.2安装步骤#
- 前置条件
在终端中执行
xcode-select --install- 设置环境变量
首先设置环境变量,方便使用国内镜像进行安装
export HOMEBREW_BREW_GIT_REMOTE="https://mirrors.tuna.tsinghua.edu.cn/git/homebrew/brew.git"
export HOMEBREW_CORE_GIT_REMOTE="https://mirrors.tuna.tsinghua.edu.cn/git/homebrew/homebrew-core.git"
export HOMEBREW_INSTALL_FROM_API=1- 安装 Homebrew
/bin/bash -c "$(curl -fsSL https://github.com/Homebrew/install/raw/master/install.sh)"- 设置镜像
# 将下面这段内容添加到 ~/.zshrc 中
export HOMEBREW_BREW_GIT_REMOTE="https://mirrors.tuna.tsinghua.edu.cn/git/homebrew/brew.git"
export HOMEBREW_API_DOMAIN="https://mirrors.tuna.tsinghua.edu.cn/homebrew-bottles/api"
export HOMEBREW_BOTTLE_DOMAIN="https://mirrors.tuna.tsinghua.edu.cn/homebrew-bottles"
完整流程是:
- 通过 HOMEBREW_API_DOMAIN 获取软件的 Formula
- Formula 中包含了 bottle 的信息,Homebrew 会从 HOMEBREW_BOTTLE_DOMAIN 检查和下载预编译包
- 如果找不到合适的预编译包,才会根据 Formula 中的指令编译源码
HOMEBREW_BREW_GIT_REMOTE
- 这个变量指向 Homebrew 的核心代码仓库
- 它不直接对应你列出的三个步骤,而是用于更新 Homebrew 自身的代码
HOMEBREW_API_DOMAIN 提供 Formula,HOMEBREW_BOTTLE_DOMAIN 提供预编译包,HOMEBREW_BREW_GIT_REMOTE 只在 brew update 更新 Homebrew 自身时用到。如果你使用的是 fish:
# 在 ~/.config/fish/config.fish 中添加以下内容
set -x HOMEBREW_BREW_GIT_REMOTE "https://mirrors.tuna.tsinghua.edu.cn/git/homebrew/brew.git"
set -x HOMEBREW_API_DOMAIN "https://mirrors.tuna.tsinghua.edu.cn/homebrew-bottles/api"
set -x HOMEBREW_BOTTLE_DOMAIN "https://mirrors.tuna.tsinghua.edu.cn/homebrew-bottles"
最后在终端中执行:
brew update1.3Brew 相关问题#
brew update and brew upgrade#
brew update
- 更新 Homebrew 自身和所有的 tap(软件仓库)
- 获取所有可用软件包的最新版本信息
- 相当于
git pull,只是获取最新的软件包信息 - 不会更新已安装的软件包
- 建议在执行
brew upgrade之前先运行此命令
brew upgrade
- 将已安装的软件包更新到最新版本
- 实际执行软件包的升级操作
- 如果不指定具体软件包名称,会更新所有已安装的软件包
- 可以指定特定软件包升级,如:
brew upgrade node
最佳实践是:
# 1. 先更新 Homebrew 和软件包信息
brew update

# 2. 然后再升级需要的软件包
brew upgrade           # 升级所有软件包
# 或
brew upgrade 软件包名 # 升级指定软件包- 如果想查看哪些包可以更新,可以使用:
brew outdated - 如果想查看已安装的包:
brew list - 如果不想更新某些包,可以将其锁定:
brew pin 软件包名
为什么有的 brew install 需要加 --cask#
普通包(Formula)#
- 通常是命令行工具或库
- 直接使用
brew install 包名安装 - 安装后的文件通常在
/usr/local/bin或/opt/homebrew/bin目录下 - 例如:git, python, node 等
Cask 包#
- 主要是 macOS 图形界面应用程序(GUI 应用)
- 使用
brew install --cask 包名安装 - 它会下载预编译的应用程序包(通常是 .dmg 或 .pkg 文件),安装后的应用会出现在
/Applications目录下 - 例如:chrome, visual-studio-code, docker-desktop 等
举例对比#
# 命令行工具安装
brew install git
brew install python

# GUI 应用安装
brew install --cask google-chrome
brew install --cask visual-studio-code- 如果是图形界面应用(比如能在 Mac App Store 找到的那种),一般用
--cask - 如果是命令行工具,一般直接
brew install
Homebrew 中 Tap 和 Core#
Core(核心仓库)#
- 是 Homebrew 的官方默认仓库
- 位于
homebrew/core - 包含最常用、最基础的软件包
- 经过严格审核和测试
- 更新可能相对较慢,因为需要经过审核流程
Tap(第三方仓库)#
- 是除了 Core 之外的额外软件源
- 可以由任何人创建和维护
- 更新更频繁,因为不需要经过 Homebrew 官方审核
- 通常由软件的开发者自己维护
以 lazygit 为例#
# 从 Core 安装
brew install lazygit  # 更稳定,但可能不是最新版

# 从开发者的 Tap 安装
brew install jesseduffield/lazygit/lazygit  # 更新更快,版本更新
格式说明:
jesseduffield/lazygit/lazygit的结构是:用户名/仓库名/软件包名
如果你需要最新功能,选择 Tap 版本
如果你更注重稳定性,选择 Core 版本
如果软件作者建议使用他们的 Tap(如 lazygit 的例子),最好遵循他们的建议
02Java#
- 查看可用的 OpenJDK 版本
使用 brew search 命令列出可用的 OpenJDK 版本:
brew search openjdk这将显示一个列表,包括长期支持 (LTS) 版本,例如:
==> Formulae
openjdk             openjdk@17          openjdk@8           openjph
openjdk@11          openjdk@21          openj9              openvdb
版本 8、11、17 和 21 是常见的 LTS 版本
- 安装所需的版本
选择要安装的 Java 版本(例如,openjdk@17 表示 Java 17)。然后使用 brew install 进行安装:
brew install openjdk@17- 配置环境变量
根据你使用的 shell,配置环境变量的方式有所不同。
3.1 Fish Shell 配置
如果你使用的是 Fish shell,请将以下几行添加到你的 ~/.config/fish/config.fish 文件中:
# 将 JAVA_HOME 设置为 OpenJDK 17 安装目录
set -x JAVA_HOME /opt/homebrew/opt/openjdk@17

# 将 OpenJDK 17 的 bin 目录添加到 PATH 的最前面
set -gx PATH /opt/homebrew/opt/openjdk@17/bin $PATH
3.2 Zsh Shell 配置
如果你使用的是 Zsh shell,请将以下几行添加到你的 ~/.zshrc 文件中:
# 将 JAVA_HOME 设置为 OpenJDK 17 安装目录
export JAVA_HOME="/opt/homebrew/opt/openjdk@17"

# 将 OpenJDK 17 的 bin 目录添加到 PATH 的最前面
export PATH="/opt/homebrew/opt/openjdk@17/bin:$PATH"- 验证安装
编辑完配置文件 (config.fish 或 .zshrc) 后,需要使配置生效:
- 对于
config.fish可以执行source ~/.config/fish/config.fish - 对于
.zshrc可以执行source ~/.zshrc或者重新启动终端:
关闭终端窗口并打开一个新窗口。
现在,检查 Java 版本:
java --version03Clang on Apple#
最近在 macOS 上尝试编译 llama.cpp 的过程中,踩了不少坑。最后的结论其实很简单:在 macOS 上,最稳妥的方案就是直接用系统自带的 Apple Clang。这样几乎不需要额外配置,避免了各种 ABI、SDK 的兼容性问题。
3.1遇到的问题#
一开始我用的是 Homebrew 安装的 LLVM/Clang:
brew install llvm然后在 CMake 的 toolchain 或者 preset 里,把编译器指定成了:
/opt/homebrew/opt/llvm/bin/clang
/opt/homebrew/opt/llvm/bin/clang++
结果一跑,问题接踵而至:
SDK 找不到 链接时提示:
shellld: library 'System' not found这是因为 Homebrew 的 clang 默认不会自动找到 macOS SDK,导致
libSystem等核心库无法链接。ABI 不兼容 在修复 SDK 之后,又遇到了链接报错:
shellUndefined symbols for architecture arm64: "std::__1::__hash_memory(void const*, unsigned long)", ...这些符号来自 libc++ 21 的新 ABI(Homebrew 的 LLVM),但链接时却跑去用了 Apple SDK 里的老版本 libc++。结果头文件和库的版本不一致,出现了典型的 ABI mismatch。
target 设置问题 有些 toolchain 文件里还写了奇怪的 target,比如
arm64-apple-darwin-macho。这种 target 会绕过 clang 的默认逻辑,进一步让 SDK 的自动发现失效。
总结一下就是:编译器、头文件、库三者不一致 → 必炸。
3.2为什么用系统自带的 Clang 就没问题?#
macOS 自带的 Apple Clang(/usr/bin/clang、/usr/bin/clang++)和 Xcode / Command Line Tools 深度绑定,默认就知道 SDK 在哪里,默认就用系统的 libc++,不会出现找不到 libSystem 或 ABI 符号冲突的问题。
比如在终端里执行:
/usr/bin/clang --version会看到类似:
Apple clang version 17.0.0 (clang-1700.0.13.5)
Target: arm64-apple-darwin24.6.0
用这个编译 llama.cpp,基本就是一条龙流程:
cmake -B build
cmake --build build
完全不需要额外指定 -isysroot、-lc++abi、-nostdinc++ 等乱七八糟的参数。
3.3如果一定要用 Homebrew 的 LLVM?#
有些场景(比如需要最新的 Clang 特性)可能确实要用 Homebrew 的 LLVM。这时候必须保证头文件和库也来自 Homebrew 的 libc++,不能混用 Apple 的。
这意味着:
编译时要加:
shell-nostdinc++ -I/opt/homebrew/opt/llvm/include/c++/v1链接时要加:
shell-L/opt/homebrew/opt/llvm/lib -Wl,-rpath,/opt/homebrew/opt/llvm/lib -lc++ -lc++abi同时还要指定
-isysroot指向 macOS SDK,用来找系统框架。
这种配置方式非常繁琐,稍有不慎就会 ABI 冲突。所以除非有强需求,否则不建议走这条路。
3.4结论#
在 macOS 上编译 llama.cpp(以及大多数需要链接系统框架的 C++ 项目),最简单、最稳妥的选择就是直接使用 Apple 自带的 Clang。
- ✅ 无需额外配置
- ✅ 自动找到 SDK 和系统库
- ✅ 避免 libc++ ABI 冲突
如果一定要用 Homebrew 的 LLVM,就要小心处理 C++ 标准库的头文件和动态库路径,否则很容易踩到 ABI mismatch 的坑。
![SUMMARY]
别折腾了,直接用系统自带的 clang,安心愉快地编译。
04Keyboard Shortcuts#
Summarize the various keyboard shortcuts I am currently using.
4.1Key Mapping#
- Map Caps Lock to Hyper key (Using Karabiner)
4.2System Wide#
Open Apps#
Use Karabiner
Open apps with Hyper key:
Hyper + Q: Open QQHyper + W: Open WeChatHyper + E: Open Browser (Easy to press)Hyper + A: Open AlacrittyHyper + S: Open SublimeHyper + D: Open VSCode (Easy to press)Hyper + Z: Open ZoteroHyper + X: Open Typora (Easy to press)Hyper + C: Open VSCode (Easy to press)Hyper + P: Open PowerPointHyper + L: Open ExcelHyper + H: Hide Current Window (Combo:Hyper + A, then+ Hto peek new messages)
Open Utilities#
Option + W: Bob TranslateOption + .: Raycast NoteCmd + Space: Trigger RaycastOption + Space: To be determinedHyper + Space: Open Raycast AI ChatOption + Cmd + Space: Open SpotlightCtrl + Option + Space: Trigger Emoji Search (Raycast)
Windows Utilities#
Option + H: First Two ThirdsOption + L: Last ThirdOption + J: Left HalfOption + K: Right HalfOption + =: Make LargerOption + =: Make SmallerOption + M: Maximize Current WindowOption + R: Reasonable SizeOption + C: Center Current WindowOption + Up: Move UpOption + Down: Move DownOption + Left: Move LeftOption + Right: Move RightOption + Shift + H: Move to Left MonitorOption + Shift + L: Move to Right Monitor
4.3VSCode#
Go to#
Cmd + P: Search files by name- By adding
@, go to symbols
- By adding
Cmd + Shift + P: Open Command PaletteCmd + Shift + O: Go to symbol in file
Copilot#
Tab: Accept suggestionCmd + Left: Accept suggestion for next tokenCmd + Down: Accept suggestion for next line
Tabs and Panels#
Ctrl + H: Go to previous tabCtrl + L: Go to next tabCtrl + J: Move current tab forwardCtrl + K: Move current tab backwardCmd + B: Toggle Primary Side BarOption + Cmd + B: Toggle Secondary Side BarCmd + J: Toggle Bottom Bar
4.4Arc#
Go to#
Cmd + 1/2/3/4/5/6/7/8: Go to favorite 1/2/3/4/5/6/7/8Cmd + T: Go to tabCmd + N: New tabCmd + ~: Switch tab
Utilities#
Shift + Cmd + C: Copy linkShift + Option + Cmd + C: Copy link in markdown format
Extensions#
Cmd + 0: Bionic On/Off
4.5BetterTouchTool#
Three Fingers#
Swipe right: Move cursor to the center of the right monitorSwipe left: Move cursor to the center of the left monitor
05AeroSpace#
5.1Concepts#
- Each workspace contains its own single root node
- Each non-leaf node is called a "Container"
- Each container can contain arbitrary number of children nodes
- Windows are the only possible leaf nodes. Windows contain zero children nodes
Every container has two properties:
- Layout (Possible values:
tiles,accordion) - Orientation (Possible values:
horizontal,vertical)
- Layout (Possible values:
Some examples:
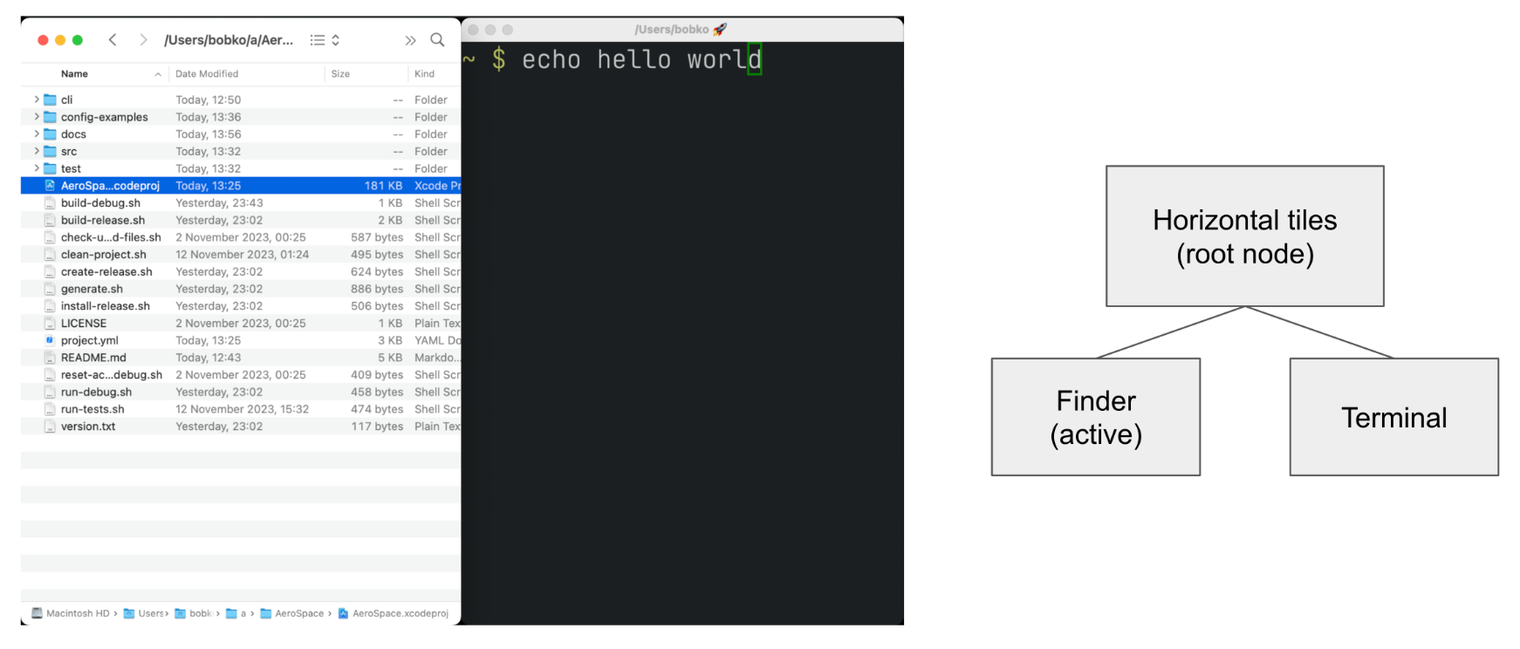
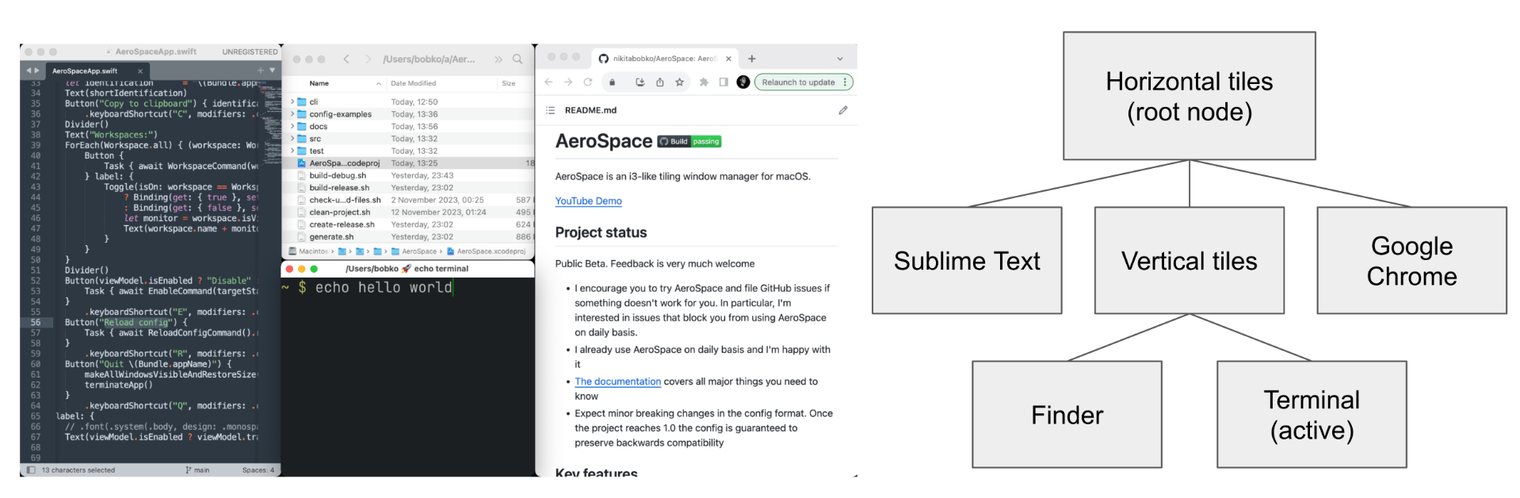
In total, AeroSpace provides 4 possible layouts:
h_tileshorizontal tiles (in i3, it’s called "horizontal split")v_tilesvertical tiles (in i3, it’s called "vertical split")h_accordionhorizontal accordion (analog of i3′s "tabbed layout")v_accordionvertical accordion (analog of i3′s "stacked layout")
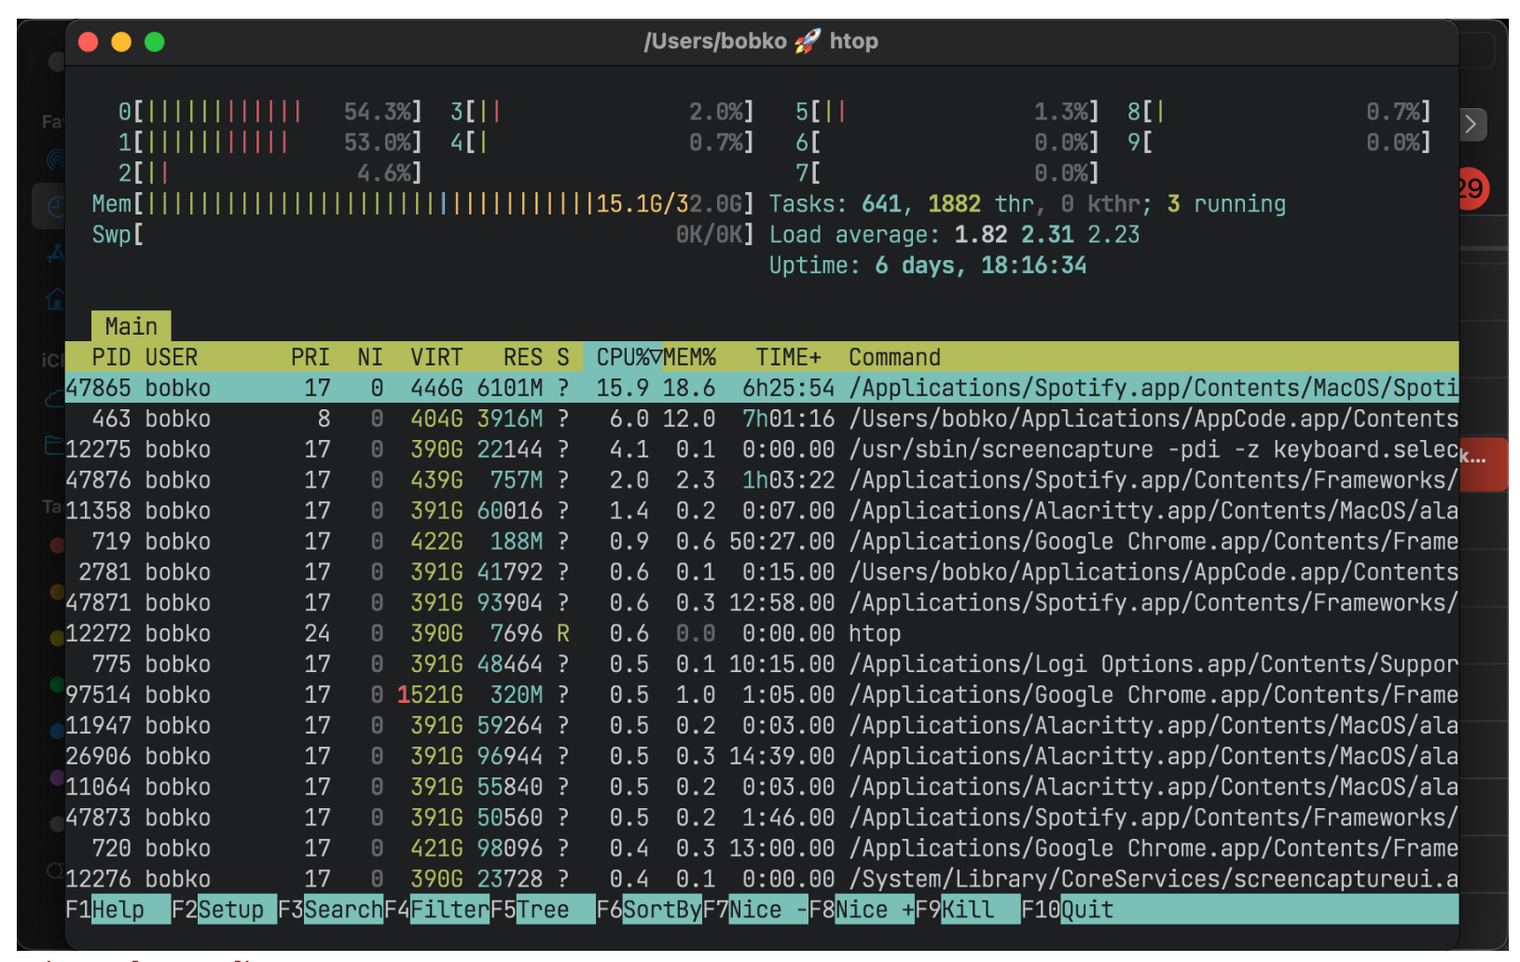
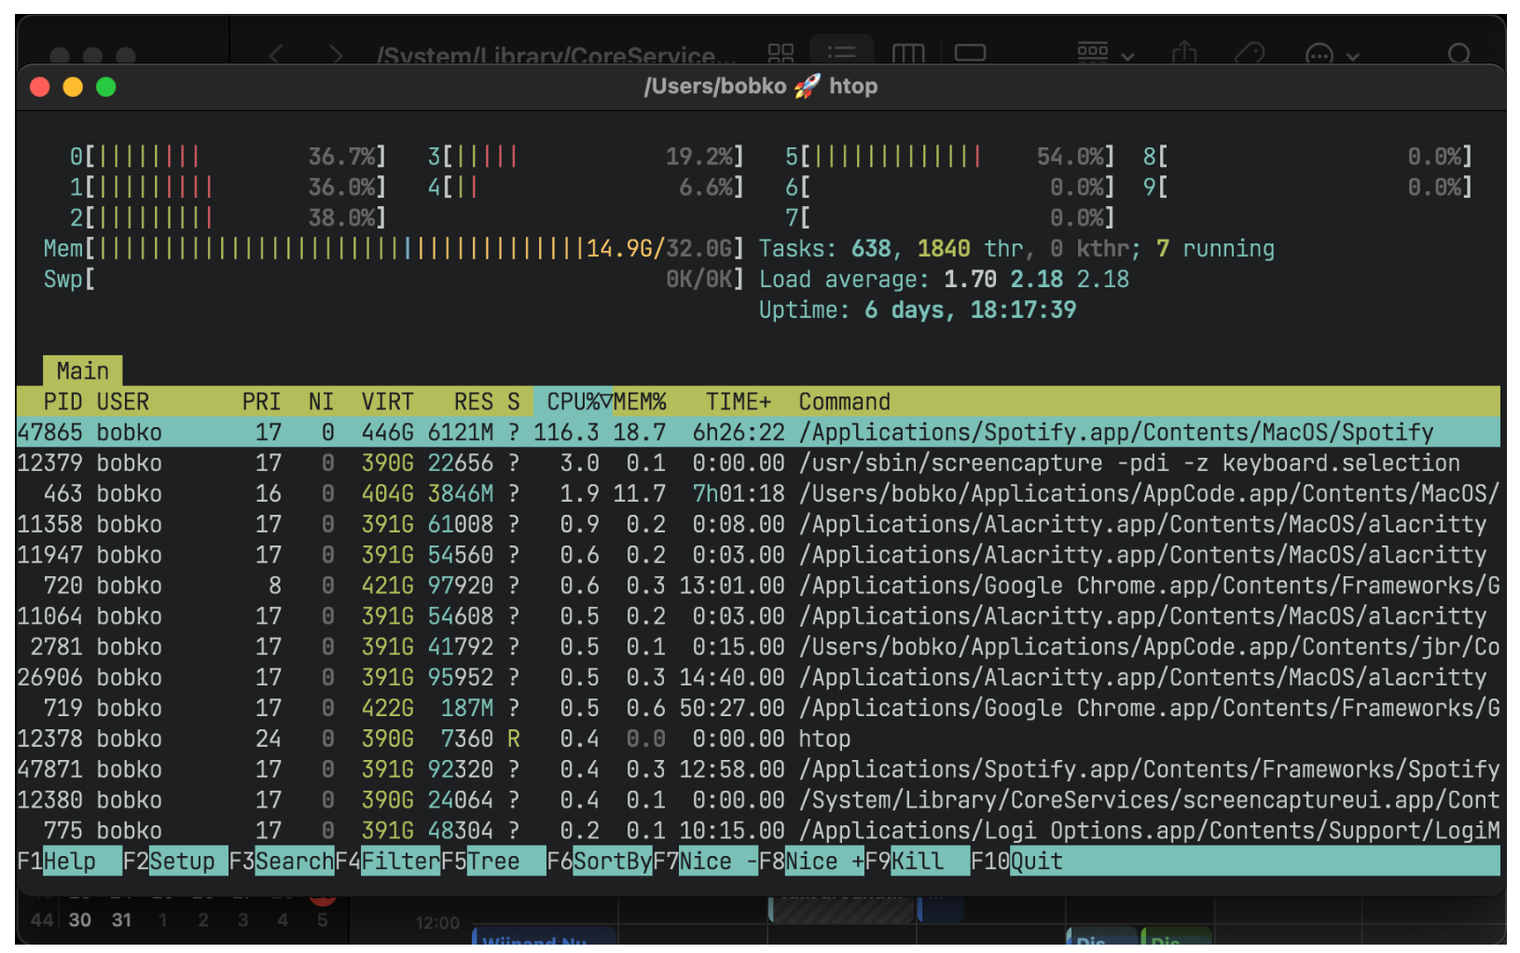
Accordion is a layout where windows are placed on top of each other.
- The horizontal accordion shows left and right paddings to visually indicate the presence of other windows in those directions.
- The vertical accordion shows top and bottom paddings to visually indicate the presence of other windows in those directions.
5.2Normalization#
By default, AeroSpace does two types of tree normalizations:
- Containers that have only one child are "flattened". The root container is an exception, it is allowed to have a single window child. Configured by
enable-normalization-flatten-containers
Example 1
According to the first normalization, such layout isn’t possible:
h_tiles (root node)
└── v_tiles
    └── window 1
it will be immediately transformed into
v_tiles (new root node)
└── window 15.3Shortcuts#
Between Workspaces#
- Switch Workspaces
alt-1 = 'workspace 1'
alt-2 = 'workspace 2'
alt-3 = 'workspace 3'
# ...
alt-b = 'workspace B'
alt-c = 'workspace C'
alt-d = 'workspace D'- Move Node to Workspaces
alt-shift-1 = 'move-node-to-workspace 1'
alt-shift-2 = 'move-node-to-workspace 2'
alt-shift-3 = 'move-node-to-workspace 3'
# ...
alt-shift-b = 'move-node-to-workspace B'
alt-shift-c = 'move-node-to-workspace C'
alt-shift-d = 'move-node-to-workspace D'
In a Workspace#
- Focus Different Node
alt-h = 'focus left'
alt-j = 'focus down'
alt-k = 'focus up'
alt-l = 'focus right'- Change Node Position
alt-shift-h = 'move left'
alt-shift-j = 'move down'
alt-shift-k = 'move up'
alt-shift-l = 'move right'- Resize Node
alt-shift-minus = 'resize smart -50'
alt-shift-equal = 'resize smart +50'06Miscellaneous#
6.1为什么有些时候我在 macos 上长按 jkhl 时会出现类似于希腊字母的选项,我只是想输入jjjjjj之类的#
(玩 Vim 玩得)
这是 macOS 的特殊字符输入功能。当你长按某些键时,会弹出带有变音符号和特殊字符的菜单。这个功能主要是为了输入带重音符号的字母(如é, ü等)
要禁用这个功能,在终端中执行以下命令:
defaults write -g ApplePressAndHoldEnabled -bool false执行后需要重启系统才能生效
6.2MacOS 相册的底层组织逻辑#
Remove from Album(从相册中移除)
- 作用:仅将选中的照片从当前相册中移除,不影响照片在图库(Library)和其他相册中的存在
- 适用场景:当你想整理相册结构(例如清理某个主题相册),但保留照片本身时使用
Delete Photos(删除照片)
- 作用:将照片从整个图库中彻底删除,并移至「最近删除」相册,30 天后永久清除
- 影响:所有包含该照片的相册(包括智能相册)中均不再显示该照片
- 适用场景:当照片不再需要,且希望释放存储空间时使用
苹果「照片」应用的核心设计基于以下原则:
中央化的图库(Library)
所有照片和视频统一存储在图库中,作为唯一的“主数据源”。相册(Albums)仅是对图库中文件的引用集合,而非实际存储位置- 类比:图库是数据库的主表,相册是关联表,仅保存对主表记录的引用
虚拟化的相册管理
- 用户创建的相册:手动选择的照片合集,移除操作仅删除引用
- 智能相册:基于规则(如日期、关键词)自动生成的动态合集,无法手动移除照片,只能修改规则。
- 系统相册:如「所有照片」「最近删除」等,具有特殊逻辑(如「最近删除」保留文件 30 天)
总结#
- Remove from Album = 整理相册结构,不删原图
- Delete Photos = 彻底删除照片,释放存储空间
- 底层逻辑:图库是核心,相册是“视图”,操作需区分引用与实体数据